在 Windows 上安装
参考:
https://grafana.com/grafana/download?pg=get&plcmt=selfmanaged-box1-cta1&edition=oss
https://grafana.com/docs/grafana/latest/setup-grafana/installation/windows/
1、下载 Grafana 二进制文件。
从浏览器下载 Grafana 二进制文件。
使用 Windows 安装程序安装(推荐)
- 单击下载安装程序。
- 打开并运行安装程序。
要运行 Grafana,请打开浏览器并转到 Grafana 端口(默认为 http://localhost:3000/),然后按照入门中的说明进行操作。
安装独立的 Windows 二进制文件
重要提示:下载 zip 文件后,在解压缩之前,请确保打开该文件的属性(右键单击“属性”)并选中unblock复选框,然后单击Ok。
将此文件夹解压缩到您希望 Grafana 运行的任何位置。
- Standalone Windows Binaries(64 Bit) - using PowerShell
> Expand-Archive .\grafana-9.3.6.windows-amd64.zip -DestinationPath 'C:\Program Files\Grafana\'启动 Grafana
在Powershell中,通过运行守护进程导航
C:\Program Files\InfluxData\chronograf并启动 InfluxDB :influxd
grafana-server.exe 通过执行位于bin目录中的 ,最好从命令行启动 Grafana 。如果您想将 Grafana 作为 Windows 服务运行,请下载 NSSM。使用该工具将 Grafana 添加为 Windows 服务非常容易。
> cd -path "C:\Program Files\Grafana\grafana-9.3.6\bin"
> ./grafana-server -h
Usage of server:
  -config string
        path to config file
  -homepath string
        path to grafana install/home path, defaults to working directory
  -packaging string
        describes the way Grafana was installed (default "unknown")
  -pidfile string
        path to pid file
  -profile
        Turn on pprof profiling
  -profile-addr string
        Define custom address for profiling (default "localhost")
  -profile-port uint
        Define custom port for profiling (default 6060)
  -tracing
        Turn on tracing
  -tracing-file string
        Define tracing output file (default "trace.out")
  -v    prints current version and exits
  -vv
        prints current version, all dependencies and exits
flag: help requested

> ./grafana-server  -config 'C:\Program Files\Grafana\grafana-9.3.6\conf\kapacitor.conf'
注意:默认的 Grafana 端口是3000. 此端口在 Windows 上可能需要额外权限。如果它没有出现在默认端口中,您可以尝试更改为不同的端口。
- 进入conf目录并复制sample.ini到custom.ini. 注意:你应该编辑custom.ini,永远不要defaults.ini。
- 编辑custom.ini并取消注释http_port配置选项(;是 ini 文件中的注释字符)并将其更改为类似8080或类似的内容。该端口不应需要额外的 Windows 权限。阅读有关配置选项的更多信息。
配置文件位置
Grafana 实例的默认设置存储在
$WORKING_DIR/conf/defaults.ini文件中。不要更改此文件。
根据您的操作系统,您的自定义配置文件是 $WORKING_DIR/conf/defaults.ini 文件或 /usr/local/etc/grafana/grafana.ini 文件。可以使用 --config 参数覆盖自定义配置文件路径。
Linux
如果您使用deb或rpm包安装了 Grafana,那么您的配置文件位于并且不使用/etc/grafana/grafana.ini单独的。custom.ini此路径在 Grafana init.d 脚本中使用–config文件参数指定。
Docker
有关环境变量、持久存储和构建自定义 Docker 映像的信息,请参阅配置 Grafana Docker映像。
视窗
在 Windows 上,该sample.ini文件位于与defaults.ini文件相同的目录中。它包含注释掉的所有设置。复制sample.ini并命名custom.ini。
苹果系统
默认情况下,配置文件位于/usr/local/etc/grafana/grafana.ini. 对于使用 Homebrew 安装的 Grafana 实例,grafana.ini直接编辑文件。否则,在该文件夹中添加一个名为的配置文件custom.ini以conf覆盖conf/defaults.ini.
删除 .ini 文件中的注释
Grafana 使用分号(;char)来注释.ini文件中的行。您必须通过从该行的开头删除来取消注释您正在修改custom.ini的文件中的每一行。否则您的更改将被忽略。grafana.ini;
例如:
The HTTP port to use
;http_port = 3000
使用环境变量覆盖配置
不要使用环境变量来添加新的配置设置。相反,使用环境变量来覆盖现有选项。
要覆盖一个选项:
GF_
其中节名是括号内的文本。一切都应该是大写的,.并且-应该替换为
default section
instance_name = ${HOSTNAME}
[security]
admin_user = admin
[auth.google]
client_secret = 0ldS3cretKey
[plugin.grafana-image-renderer]
rendering_ignore_https_errors = true
[feature_toggles]
enable = newNavigation
你可以在 Linux 机器上覆盖它们:
export GF_DEFAULT_INSTANCE_NAME=my-instance
export GF_SECURITY_ADMIN_USER=owner
export GF_AUTH_GOOGLE_CLIENT_SECRET=newS3cretKey
export GF_PLUGIN_GRAFANA_IMAGE_RENDERER_RENDERING_IGNORE_HTTPS_ERRORS=true
export GF_FEATURE_TOGGLES_ENABLE=newNavigation
将 Grafana 注册为本地服务
从网上下载的Windows下的 Grafana 是控制台程序,打开窗口后,很容易被别人给关掉,因此考虑做成Windows服务,nssm正是解决该问题的利器。
1、下载nssm:
下载地址:http://www.nssm.cc/download
查看官网提示,如果是win10,并且更新到了“Creators Update”,应该下载 “nssm 2.24-101-g897c7ad” 版本,否则启动时会报错
2、解压下载的nssm,找到里面的64位版本(我的电脑也是64位的),放到和influxdb同级的目录
在Powershell中,通过运行守护nssm注册服务
> cd -Path 'C:\Program Files\InfluxData\chronograf'
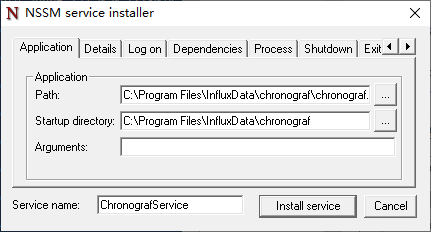
> ./nssm.exe install ChronografService
在弹出框中选择Chronograf的运行程序:
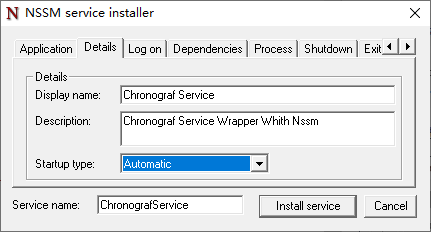
你也可以设置一些其他的服务信息(可选)
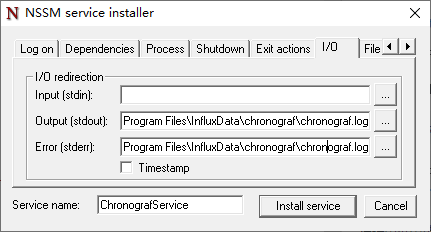
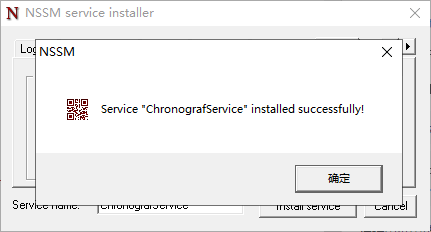
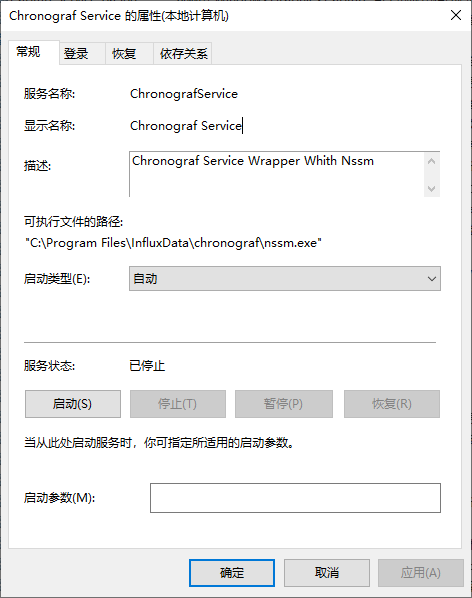
点击确定,则成功注册windows服务,如下所示:
到windows服务中,启动 ChronografService 即可:
如需卸载服务
在Powershell中,通过运行守护nssm注册服务
> cd -Path 'C:\Program Files\InfluxData\chronograf'
> ./nssm.exe remove ChronografService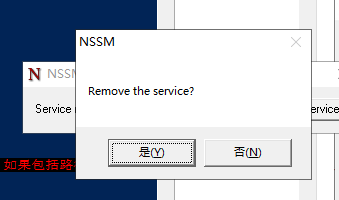
更多使用方式参考官方说明:http://www.nssm.cc/usage
最后编辑:Jeebiz 更新时间:2024-02-26 11:21
