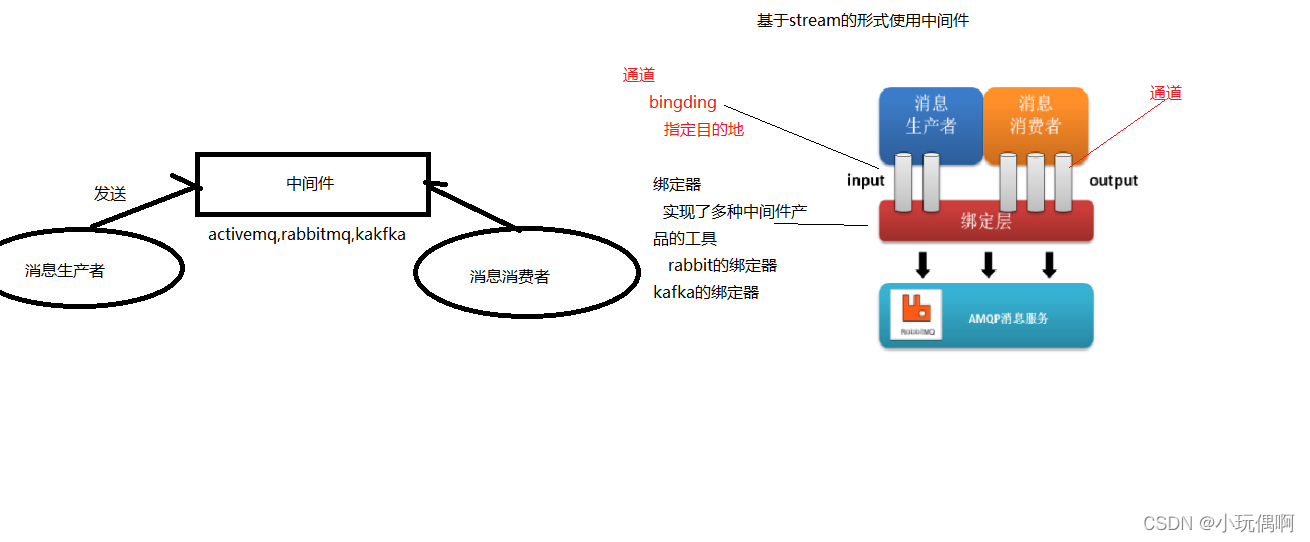
Spring Cloud Stream由一个中间件中立的核组成。应用通过Spring Cloud Stream插入的input(相当于消费者consumer,它是从队列中接收消息的)和output(相当于生产者producer,它是从队列中发送消息的。)通道与外界交流。通道通过指定中间件的Binder实现与外部代理连接。业务开发者不再关注具体消息中间件,只需关注Binder对应用程序提供的抽象概念来使用消息中间件实现业务即可。

消息生产者
- 1.引入依赖
- 2.配置application.yml文件
- 3.发送消息的话,定义一个通道接口,通过接口中内置的messagechannel springcloudstream中内置接口 Source
- 4.@EnableBinding : 绑定对应通道
- 5.发送消息的话,通过MessageChannel发送消息
- 如果需要MessageChannel –> 通过绑定的内置接口获取
1、pom.xml 引入依赖
<dependencies>
    <!-- For Spring Cloud Stream With RabbitMQ -->
    <dependency>
        <groupId>org.springframework.cloud</groupId>
        <artifactId>spring-cloud-starter-stream-rabbit</artifactId>
    </dependency>
    <dependency>
        <groupId>org.springframework.cloud</groupId>
        <artifactId>spring-cloud-stream-binder-rabbit</artifactId>
    </dependency>
</dependencies>
2、配置文件
配置 RabbitMQ 的安装地址、端口以及账户信息
spring:
  # Rabbitmq 配置
  rabbitmq:
    host: 192.168.31.100
    port: 5672
    username: admin
    password: admin
    virtual-host: /
    publisher-confirm-type: simple
    #启动消息失败返回,比如路由不到队列时触发回调
    publisher-returns: true
    listener:
      simple:
        #NONE:自动确认;AUTO:根据情况确认;MANUAL:手动确认
        acknowledge-mode: auto
      direct:
        #NONE:自动确认;AUTO:根据情况确认;MANUAL:手动确认
        acknowledge-mode: auto
  cloud:
    stream:
      bindings:
        output:
          #指定消息发送的目的地,在rabbitmq中,发送到一个rbt-default的exchange中
          destination: rbt-default
        myoutput:
          destination: rbt-custom-output
          producer:
            #分区关键字 对象中的id,对象
            partition-key-expression: payload
            #分区大小
            partition-count: 2
      binders:
        #配置绑定器
        defaultRabbit:
type: rabbit- contentType:用于指定消息的类型。具体可以参考 spring cloud stream docs
- destination:指定了消息发送的目的地,对应 RabbitMQ,会发送到 exchange 是 itcastdefault 的所有消息队列中。
3、测试发送消息
/**
 * 入门案例:
 *      1.引入依赖
 *      2.配置application.yml文件
 *      3.发送消息的话,定义一个通道接口,通过接口中内置的messagechannel
 *              springcloudstream中内置接口  Source
 *      4.@EnableBinding : 绑定对应通道
 *      5.发送消息的话,通过MessageChannel发送消息
 *          * 如果需要MessageChannel --> 通过绑定的内置接口获取
 */
@SpringBootApplication
@EnableBinding(Source.class)
public class ProducerApplication implements CommandLineRunner{

    @Autowired
    private MessageChannel output;

    public static void main(String[] args) {
        SpringApplication.run(ProducerApplication.class);
    }

    @Override
    public void run(String... args) throws Exception {
        //发送消息
        //通过工具类messageBuilder:创建消息
        output.send(MessageBuilder.withPayload("hello老六").build());
    }
}
运行启动类:成功效果如下:
消息消费者
- 1.引入依赖
- 2.配置application.yml文件
- 3.需要配置一个通道的接口
- 内置获取消息的通道接口 sink
- 4.绑定通道
- 5.配置一个监听的方法:当程序从中间件获取数据后,需要在监听方法上配置一个StreamListener
1、pom.xml 引入依赖
<dependencies>
    <!-- For Spring Cloud Stream With RabbitMQ -->
    <dependency>
        <groupId>org.springframework.cloud</groupId>
        <artifactId>spring-cloud-starter-stream-rabbit</artifactId>
    </dependency>
    <dependency>
        <groupId>org.springframework.cloud</groupId>
        <artifactId>spring-cloud-stream-binder-rabbit</artifactId>
    </dependency>
</dependencies>
2、配置文件
配置 RabbitMQ 的安装地址、端口以及账户信息
spring:
  # Rabbitmq 配置
  rabbitmq:
    host: 192.168.31.100
    port: 5672
    username: admin
    password: admin
    virtual-host: /
    publisher-confirm-type: simple
    #启动消息失败返回,比如路由不到队列时触发回调
    publisher-returns: true
    listener:
      simple:
        #NONE:自动确认;AUTO:根据情况确认;MANUAL:手动确认
        acknowledge-mode: auto
      direct:
        #NONE:自动确认;AUTO:根据情况确认;MANUAL:手动确认
        acknowledge-mode: auto
  cloud:
    stream:
      #instanceCount: 2  #消费者总数
      #instanceIndex: 0  #当前消费者的索引
      bindings:
        input:
          #内置的获取消息的通道 , 从rbt-default中获取消息
          destination: rbt-default
      binders:
        #配置绑定器
        defaultRabbit:
type: rabbit- contentType:用于指定消息的类型。具体可以参考 spring cloud stream docs
- destination:指定了消息发送的目的地,对应 RabbitMQ,会发送到 exchange 是 itcastdefault 的所有消息队列中。
3、测试接收消息
/**
 * 入门案例:
 *      1.引入依赖
 *      2.配置application.yml文件
 *      3.需要配置一个通道的接口
 *         内置获取消息的通道接口 sink
 *      4.绑定通道
 *      5.配置一个监听的方法:当程序从中间件获取数据后,窒息感的业务逻辑方法
 *          需要在监听方法上配置一个StreamListener
 */
@SpringBootApplication
@EnableBinding(Sink.class)
public class ConsumerApplication{

    public static void main(String[] args) {

        SpringApplication.run(ConsumerApplication.class);
    }
    @StreamListener(Sink.INPUT)
    public void input(String message){
        System.out.println("获取到的消息是:"+message);
    }
}
参考资料
https://www.cnblogs.com/coderArron/p/16207926.html#Spring_Cloud_Stream__7
https://blog.csdn.net/weixin_43638238/article/details/126188294
作者:Jeebiz 创建时间:2023-03-30 10:35
最后编辑:Jeebiz 更新时间:2025-12-02 17:24
最后编辑:Jeebiz 更新时间:2025-12-02 17:24
