Elasticsearch 安装说明(Dcoker)
- Docker 厂库:https://hub.docker.com/_/elasticsearch
- https://www.elastic.co/guide/en/elasticsearch/reference/current/docker.html
Elasticsearch 是一种分布式 RESTful 搜索和分析引擎,能够解决越来越多的用例。作为 Elastic Stack 的核心,它集中存储您的数据,以便您发现预期和意外情况。
启动单节点集群
安装 Docker。访问获取 Docker为你的环境安装 Docker。
如果使用 Docker Desktop,请确保分配至少 4GB 内存。您可以通过转到
“设置”>“资源”来调整 Docker Desktop 中的内存使用情况。
创建一个新的 Docker 网络
为 Elasticsearch 和 Kibana 创建一个新的 Docker 网络。
docker network create elastic拉取 Elasticsearch Docker 镜像
docker pull docker.elastic.co/elasticsearch/elasticsearch:8.14.1为您的环境安装 Cosign。然后使用 Cosign 验证 Elasticsearch 映像的签名(可选)。
wget https://artifacts.elastic.co/cosign.pub
cosign verify --key cosign.pub docker.elastic.co/elasticsearch/elasticsearch:8.14.1
该 cosign 命令以 JSON 格式打印检查结果和签名负载:
Verification for docker.elastic.co/elasticsearch/elasticsearch:8.14.1 --
The following checks were performed on each of these signatures:
  - The cosign claims were validated
  - Existence of the claims in the transparency log was verified offline
  - The signatures were verified against the specified public key
创建挂载点目录
Linux:
mkdir -p /usr/local/es/data /usr/local/es/config /usr/local/es/plugins
chmod 777  /usr/local/es/data
chmod 777  /usr/local/es/config
chmod 777 /usr/local/es/pluginsWindows:
mkdir -p C:/ProgramData/es/data
mkdir -p C:/ProgramData/es/config
mkdir -p C:/ProgramData/es/plugins
启动 Elasticsearch 容器
docker run --name es01 --net elastic -p 9200:9200 -it -m 2GB docker.elastic.co/elasticsearch/elasticsearch:8.14.1后台运行:
docker run -d --restart=always --name es01 --network elastic -p 9200:9200 -p 9300:9300 -it -m 2GB docker.elastic.co/elasticsearch/elasticsearch:8.14.1使用
-m标志为容器设置内存限制。这样就无需手动设置 JVM 大小。
Linux:
#docker run -d --restart=always --name es01 --network elastic -p 9200:9200 -p 9300:9300 --privileged -v /usr/local/es/data:/usr/share/elasticsearch/data -v /usr/local/es/plugins:/usr/share/elasticsearch/plugins -e "discovery.type=single-node" -e "ES_JAVA_OPTS=-Xms512m -Xmx512m" docker.elastic.co/elasticsearch/elasticsearch:8.14.1

docker run -d --restart=always --name es01 --network elastic -p 9200:9200 -p 9300:9300 -it -m 2GB --privileged -v /usr/local/es/data:/usr/share/elasticsearch/data -v /usr/local/es/plugins:/usr/share/elasticsearch/plugins docker.elastic.co/elasticsearch/elasticsearch:8.14.1
复制生成的elastic密码和注册令牌。这些凭据仅在您首次启动 Elasticsearch 时显示。您可以使用以下命令重新生成凭据。
2024-06-21 22:49:10 ━━━━━━━━━━━━━━━━━━━━━━━━━━━━━━━━━━━━━━━━━━━━━━━━━━━━━━━━━━━━━━━━━━━━━━━━━━━━━━━━━━━━━━━━━━━━━━━━━━━━━━━━━━━━━━━━━━━━━━━━
2024-06-21 22:49:10 ✅ Elasticsearch security features have been automatically configured!
2024-06-21 22:49:10 ✅ Authentication is enabled and cluster connections are encrypted.
2024-06-21 22:49:10
2024-06-21 22:49:10 ℹ️  Password for the elastic user (reset with `bin/elasticsearch-reset-password -u elastic`):
2024-06-21 22:49:10   NfV-emiXh6SEvPn_*_yX
2024-06-21 22:49:10
2024-06-21 22:49:10 ℹ️  HTTP CA certificate SHA-256 fingerprint:
2024-06-21 22:49:10   3620d5c4e4ac55c4e035aa410d26b382aef7fae56ac9066eb69c4d1b3fb23283
2024-06-21 22:49:10
2024-06-21 22:49:10 ℹ️  Configure Kibana to use this cluster:
2024-06-21 22:49:10 • Run Kibana and click the configuration link in the terminal when Kibana starts.
2024-06-21 22:49:10 • Copy the following enrollment token and paste it into Kibana in your browser (valid for the next 30 minutes):
2024-06-21 22:49:10   eyJ2ZXIiOiI4LjE0LjAiLCJhZHIiOlsiMTcyLjIyLjAuMjo5MjAwIl0sImZnciI6IjM2MjBkNWM0ZTRhYzU1YzRlMDM1YWE0MTBkMjZiMzgyYWVmN2ZhZTU2YWM5MDY2ZWI2OWM0ZDFiM2ZiMjMyODMiLCJrZXkiOiJDc1ZGTzVBQjVQOXFSNk1iMHZZQzpsekR1MFBCVVFlRzFONmpLdFp6Q2NBIn0=
2024-06-21 22:49:10
2024-06-21 22:49:10 ℹ️ Configure other nodes to join this cluster:
2024-06-21 22:49:10 • Copy the following enrollment token and start new Elasticsearch nodes with `bin/elasticsearch --enrollment-token <token>` (valid for the next 30 minutes):
2024-06-21 22:49:10   eyJ2ZXIiOiI4LjE0LjAiLCJhZHIiOlsiMTcyLjIyLjAuMjo5MjAwIl0sImZnciI6IjM2MjBkNWM0ZTRhYzU1YzRlMDM1YWE0MTBkMjZiMzgyYWVmN2ZhZTU2YWM5MDY2ZWI2OWM0ZDFiM2ZiMjMyODMiLCJrZXkiOiJETVZGTzVBQjVQOXFSNk1iMHZZRTpzdXoxd05sVVN4VzJkUk9sVDA5aWVBIn0=
2024-06-21 22:49:10
2024-06-21 22:49:10   If you're running in Docker, copy the enrollment token and run:
2024-06-21 22:49:10   `docker run -e "ENROLLMENT_TOKEN=<token>" docker.elastic.co/elasticsearch/elasticsearch:8.14.1`
2024-06-21 22:49:10 ━━━━━━━━━━━━━━━━━━━━━━━━━━━━━━━━━━━━━━━━━━━━━━━━━━━━━━━━━━━━━━━━━━━━━━━━━━━━━━━━━━━━━━━━━━━━━━━━━━━━━━━━━━━━━━━━━━━━━━━━
从上面的日志可见,用户 elastic 的默认密码是 NfV-emiXh6SEvPn_*_yX
docker exec -it es01 /usr/share/elasticsearch/bin/elasticsearch-reset-password -u elastic
docker exec -it es01 /usr/share/elasticsearch/bin/elasticsearch-create-enrollment-token -s kibana
我们建议将elastic密码作为环境变量存储在 shell 中。例如:
export ELASTIC_PASSWORD="your_password"将 SSL 证书 http_ca.crt 从容器复制到本地机器。
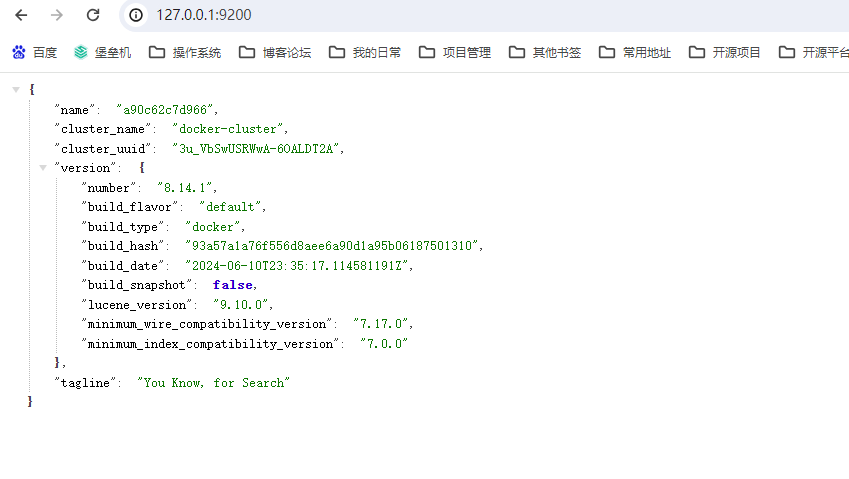
docker cp es01:/usr/share/elasticsearch/config/certs/http_ca.crt .对 Elasticsearch 进行 REST API 调用以确保 Elasticsearch 容器正在运行。
curl --cacert http_ca.crt --u elastic:$ELASTIC_PASSWORD https://localhost:9200编写elasticsearch.yml
先进入es01容器
docker exec -it es01 /bin/bash跳转到config目录下
cd config关闭 密码安全验证
echo 'xpack.security.enabled: false' >> elasticsearch.yml重启es容器
docker restart es对 Elasticsearch 进行 REST API 调用以确保 Elasticsearch 容器正在运行。
curl --cacert http_ca.crt -u elastic:$ELASTIC_PASSWORD https://localhost:9200添加更多节点编辑
使用现有节点为新节点生成注册令牌。
docker exec -it es01 /usr/share/elasticsearch/bin/elasticsearch-create-enrollment-token -s node注册令牌有效期为 30 分钟。
启动一个新的 Elasticsearch 容器。将注册令牌作为环境变量包含在内。
docker run -e ENROLLMENT_TOKEN="<token>" --name es02 --net elastic -it -m 1GB docker.elastic.co/elasticsearch/elasticsearch:8.14.1调用cat nodes API来验证节点是否已添加到集群。
curl --cacert http_ca.crt -u elastic:$ELASTIC_PASSWORD https://localhost:9200/_cat/nodes
作者:Jeebiz 创建时间:2024-06-16 16:38
最后编辑:Jeebiz 更新时间:2024-06-22 23:54
最后编辑:Jeebiz 更新时间:2024-06-22 23:54
