一、安装准备
1、系统要求
| 最低要求 | |
|---|---|
| CPU | 支持 64 位的 Intel® 或 AMD 处理器*;2 GHz 或速度更快的处理器 |
| 内存 | 4 GB 或更大 RAM(推荐使用 16 GB) |
| 硬盘 | 需要 50GB 以上的可用磁盘空间 |
| 操作系统 | CentOS 7 或更高版本 |
2、软件要求
- Oracle 18c-xe Linux x86-64
二、系统设置
1、设置镜像源
因为国外镜像网速较慢,推荐设置阿里云镜像源:https://opsx.alibaba.com/mirror
1.1、备份
[root@oracle18c-xe ~]# mv /etc/yum.repos.d/CentOS-Base.repo /etc/yum.repos.d/CentOS-Base.repo.backup1.2、下载新的CentOS-Base.repo 到/etc/yum.repos.d/
[root@oracle18c-xe ~]# wget -O /etc/yum.repos.d/CentOS-Base.repo http://mirrors.aliyun.com/repo/Centos-7.repo或者
[root@oracle18c-xe ~]# curl -o /etc/yum.repos.d/CentOS-Base.repo http://mirrors.aliyun.com/repo/Centos-7.repo1.3、之后运行 yum makecache 生成缓存
[root@oracle18c-xe]# sudo yum makecache all;1.4、执行 yum update 更新系统组件到最新版本
[root@oracle18c-xe]# sudo yum update -y;2、配置静态IP
通常在/etc/sysconfig/network-scripts目录下都会有 ifcfg-eth0 格式文件,修改该文件内容:
[root@oracle18c-xe ~]# vim /etc/sysconfig/network-scripts/ifcfg-eth0
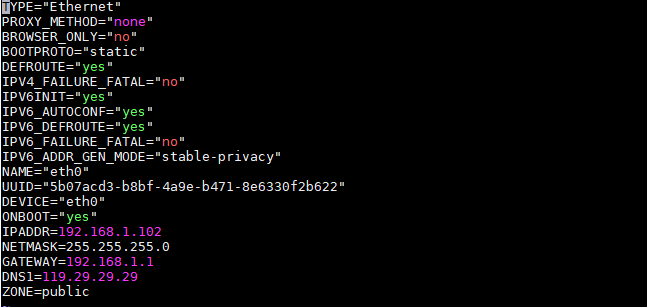
主要修改BOOTPROTO="static"、ONBOOT="yes",并增加 IPADDR、NETMASK、GATEWAY、DNS1。
TYPE="Ethernet"
PROXY_METHOD="none"
BROWSER_ONLY="no"
BOOTPROTO="static"
DEFROUTE="yes"
IPV4_FAILURE_FATAL="no"
IPV6INIT="yes"
IPV6_AUTOCONF="yes"
IPV6_DEFROUTE="yes"
IPV6_FAILURE_FATAL="no"
IPV6_ADDR_GEN_MODE="stable-privacy"
NAME="eth0"
UUID="5b07acd3-b8bf-4a9e-b471-8e6330f2b622"
DEVICE="eth0"
ONBOOT="yes"
IPADDR=192.168.1.102
NETMASK=255.255.255.0
GATEWAY=192.168.1.1
DNS1=119.29.29.29
ZONE=public
重启网卡
[root@oracle18c-xe ~]# service network restart3、关闭防火墙
常用命令
[root@oracle18c-xe]# systemctl start firewalld    启动
[root@oracle18c-xe]# systemctl stop firewalld    关闭
[root@oracle18c-xe]# systemctl status firewalld    查看状态
[root@oracle18c-xe]# systemctl disable firewalld    开机禁用
[root@oracle18c-xe]# systemctl enable firewalld    开机启用
4、系统优化
4.1、配置主机时间、时区、系统语言
查看时区
[root@oracle18c-xe]# date -R 或者 timedatectl修改时区
[root@oracle18c-xe]# ln -sf /usr/share/zoneinfo/Asia/Shanghai /etc/localtime修改系统语言环境
[root@oracle18c-xe]# sudo echo 'LANG="en_US.UTF-8"' >> /etc/profile;source /etc/profile三、服务安装
1、下载 Oracle 18c-xe
官方地址:https://www.oracle.com/database/technologies/xe-downloads.html

根据系统平台架构选择下载不同的版本,此处以 Linux x86-64 为例:

2、安装 Oracle 18c-xe
快速开始:https://www.oracle.com/database/technologies/appdev/xe/quickstart.html
将下载到本地的安装包 oracle-database-xe-18c-1.0-1.x86_64.rpm 上传到Linux操作系统的u01目录下:
[root@oracle18c-xe u01]# ls
oracle-database-xe-18c-1.0-1.x86_64.rpm
根据不同平台执行不同命令:
- Oracle Linux
yum -y localinstall oracle-database*18c*
/etc/init.d/oracle-xe-18c configure- Red Hat compatible Linux distribution
[root@oracle18c-xe ~]# cd /u01
[root@oracle18c-xe u01]# curl -o oracle-database-preinstall-18c-1.0-1.el7.x86_64.rpm https://yum.oracle.com/repo/OracleLinux/OL7/latest/x86_64/getPackage/oracle-database-preinstall-18c-1.0-1.el7.x86_64.rpm
[root@oracle18c-xe u01]# yum -y localinstall oracle-database*18c*
[root@oracle18c-xe u01]# /etc/init.d/oracle-xe-18c configure
Specify a password to be used for database accounts. Oracle recommends that the password entered should be at least 8 characters in length, contain at least 1 uppercase character, 1 lower case character and 1 digit [0-9]. Note that the same password will be used for SYS, SYSTEM and PDBADMIN accounts:
数据库创建完成。有关详细信息, 请查看以下位置的日志文件:
 /opt/oracle/cfgtoollogs/dbca/XE。
数据库信息:
全局数据库名:XE
系统标识符 (SID):XE
有关详细信息, 请参阅日志文件 "/opt/oracle/cfgtoollogs/dbca/XE/XE.log"。
详细安装说明,可参见官方 Installation Guide for Linux x86-64
- Windows
详细安装说明,可参见官方 Installation Guide for Microsoft Windows
作者:Jeebiz 创建时间:2023-01-11 11:27
最后编辑:Jeebiz 更新时间:2025-11-03 22:29
最后编辑:Jeebiz 更新时间:2025-11-03 22:29
