一、安装准备
1、系统要求
| 最低要求 | |
|---|---|
| CPU | 支持 64 位的 Intel® 或 AMD 处理器*;2 GHz 或速度更快的处理器 |
| 内存 | 4 GB 或更大 RAM(推荐使用 16 GB)(grep MemTotal /proc/meminfo 命令查看) |
| 交换空间 | SWAP交换空间大小根据内存大小决定(使用:grep SwapTotal /proc/meminfo 命令查看) |
| 硬盘 | 需要 50GB 以上的可用磁盘空间, /tmp文件空闲不低于400M,软件安装目录空间最好不低于5G (使用:df -h命令查看) |
| 操作系统 | CentOS 7 或更高版本 |
2、软件要求
- Oracle 11g Linux x86-64
二、系统设置
1、设置镜像源
因为国外镜像网速较慢,推荐设置阿里云镜像源:https://opsx.alibaba.com/mirror
1.1、备份
[root@oracle11g ~]# mv /etc/yum.repos.d/CentOS-Base.repo /etc/yum.repos.d/CentOS-Base.repo.backup1.2、下载新的CentOS-Base.repo 到/etc/yum.repos.d/
[root@oracle11g ~]# wget -O /etc/yum.repos.d/CentOS-Base.repo http://mirrors.aliyun.com/repo/Centos-7.repo或者
[root@oracle11g ~]# curl -o /etc/yum.repos.d/CentOS-Base.repo http://mirrors.aliyun.com/repo/Centos-7.repo1.3、之后运行 yum makecache 生成缓存
[root@oracle11g]# sudo yum makecache all;1.4、执行 yum update 更新系统组件到最新版本
[root@oracle11g]# sudo yum update -y;2、配置静态IP
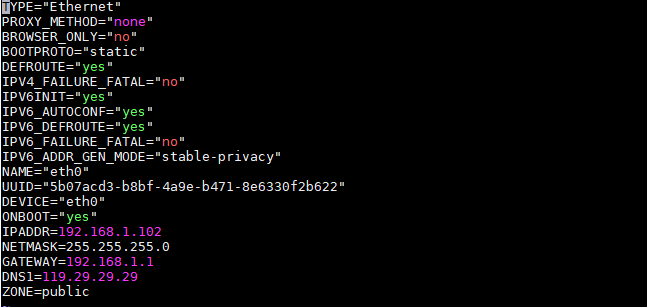
通常在/etc/sysconfig/network-scripts目录下都会有 ifcfg-eth0 格式文件,修改该文件内容:
[root@oracle11g ~]# vim /etc/sysconfig/network-scripts/ifcfg-eth0
主要修改BOOTPROTO="static"、ONBOOT="yes",并增加 IPADDR、NETMASK、GATEWAY、DNS1。
TYPE="Ethernet"
PROXY_METHOD="none"
BROWSER_ONLY="no"
BOOTPROTO="static"
DEFROUTE="yes"
IPV4_FAILURE_FATAL="no"
IPV6INIT="yes"
IPV6_AUTOCONF="yes"
IPV6_DEFROUTE="yes"
IPV6_FAILURE_FATAL="no"
IPV6_ADDR_GEN_MODE="stable-privacy"
NAME="eth0"
UUID="5b07acd3-b8bf-4a9e-b471-8e6330f2b622"
DEVICE="eth0"
ONBOOT="yes"
IPADDR=192.168.1.121
NETMASK=255.255.255.0
GATEWAY=192.168.1.1
DNS1=119.29.29.29
ZONE=public
重启网卡
[root@oracle11g ~]# service network restart3、关闭防火墙
常用命令
[root@oracle11g ~]# systemctl start firewalld    启动
[root@oracle11g ~]# systemctl stop firewalld    关闭
[root@oracle11g ~]# systemctl status firewalld    查看状态
[root@oracle11g ~]# systemctl disable firewalld    开机禁用
[root@oracle11g ~]# systemctl enable firewalld    开机启用
4、系统优化
4.1、配置主机时间、时区、系统语言
查看时区
[root@oracle11g ~]# date -R 或者 timedatectl修改时区
[root@oracle11g ~]# ln -sf /usr/share/zoneinfo/Asia/Shanghai /etc/localtime修改系统语言环境
[root@oracle11g ~]# sudo echo 'LANG="en_US.UTF-8"' >> /etc/profile;source /etc/profile4.2、关闭 SELINUX
[root@oracle11g ~]# vim /etc/selinux/config设置SELINUX=disabled

[root@oracle11g ~]# setenforce 0三、配置环境
1、添加安装用户和用户组
[root@oracle11g u01]# groupadd oinstall
[root@oracle11g u01]# groupadd dba
[root@oracle11g u01]# useradd -g oinstall -G dba oracle
[root@oracle11g u01]# passwd oracle
Changing password for user oracle.
New password:
BAD PASSWORD: The password is shorter than 8 characters
Retype new password:
passwd: all authentication tokens updated successfully.
[root@oracle11g ~]# id oracle
uid=1001(oracle) gid=1001(oinstall) groups=1001(oinstall),1002(dba)
2、给oracle用户设置 sudo 使用权
[root@oracle11g ~]# vi /etc/sudoers在root ALL=(ALL:ALL) ALL 下面添加一行:
## Allow root to run any commands anywhere
root    ALL=(ALL)       ALL
oracle  ALL=(ALL)       ALL
说明:格式为(用户名 网络中的主机=(执行命令的目标用户) 执行的命令范围)
修改完后,按Esc退出,输入wq!保存。
3、修改系统的内核参数
[root@oracle11g ~]# vi /etc/sysctl.conf在末尾添加以下内容:
fs.aio-max-nr = 1048576
fs.file-max = 6815744
kernel.shmall = 2097152
kernel.shmmax = 2147483648
kernel.shmmni = 4096
kernel.sem = 250 32000 100 128
net.ipv4.ip_local_port_range = 9000 65500
net.core.rmem_default = 1048576
net.core.rmem_max = 4194304
net.core.wmem_default = 262144
net.core.wmem_max = 1048576重启生效内核参数;(其中 kernel.shmmax = 1073741824 为本机物理内存(2G)的一半,单位为byte)
[root@oracle11g ~]# sysctl -p4、修改用户的限制参数
修改/etc/security/limits.conf 文件:
[root@oracle11g ~]# vi /etc/security/limits.conf在末尾添加以下内容:
oracle soft   nofile 65536
oracle hard   nofile 65536
oracle soft   nproc  2047
oracle hard   nproc  16384
修改/etc/pam.d/login文件:
[root@oracle11g ~]# vi /etc/pam.d/login在末尾添加以下内容:
session required  /lib64/security/pam_limits.so
session required  pam_limits.so
修改/etc/profile文件:
[root@oracle11g ~]# vi /etc/profile在末尾添加以下内容:
#oracle配置
if [ $USER = "oracle" ]; then
  if [ $SHELL = "/bin/ksh" ]; then
      ulimit -p 16384
      ulimit -n 65536
  else
      ulimit -u 16384 -n 65536
  fi
fi
5、创建安装目录和配置环境变量
创建安装目录和设置文件权限
[root@oracle11g ~]# mkdir -p /u01/oracle/product/11.2.0
[root@oracle11g ~]# mkdir /u01/oracle/oradata
[root@oracle11g ~]# mkdir /u01/oracle/inventory
[root@oracle11g ~]# mkdir /u01/oracle/fast_recovery_area
[root@oracle11g ~]# chown -R oracle:oinstall /u01/oracle
[root@oracle11g ~]# chmod -R 775 /u01/oracle
修改oracle用户的环境变量
#首先切换到oracle用户下:
[root@oracle11g ~]# su -l oracle
[root@oracle11g ~]# vi .bash_profile umask 022
 # 添加在最后一句之前
PATH=$PATH:$HOME/.local/bin:$HOME/bin:/usr/X11R6/bin
LD_LIBRARY_PATH=/usr/lib:/usr/X11R6/lib
ORACLE_BASE=/u01/oracle
ORACLE_HOME=$ORACLE_BASE/product/11.2.0/dbhome_1
ORACLE_SID=oracle11
LD_LIBRARY_PATH=$ORACLE_HOME/rdbms/lib:$ORACLE_HOME/lib:$LD_LIBRARY_PATH
PATH=$ORACLE_HOME/bin:$PATH
export PATH LD_LIBRARY_PATH
export ORACLE_BASE ORACLE_HOME ORACLE_SID
export NLS_LANG=AMERICAN_AMERICA.AL32UTF8
export LC_ALL=en_US.UTF-8
注意,ORACLE_SID 必须与创建的数据库实例名称一致,否则数据库启动后无法访问。
[root@oracle11g ~]# source .bash_profile四、准备安装包
官方指南:https://docs.oracle.com/cd/E11882_01/nav/portal_11.htm
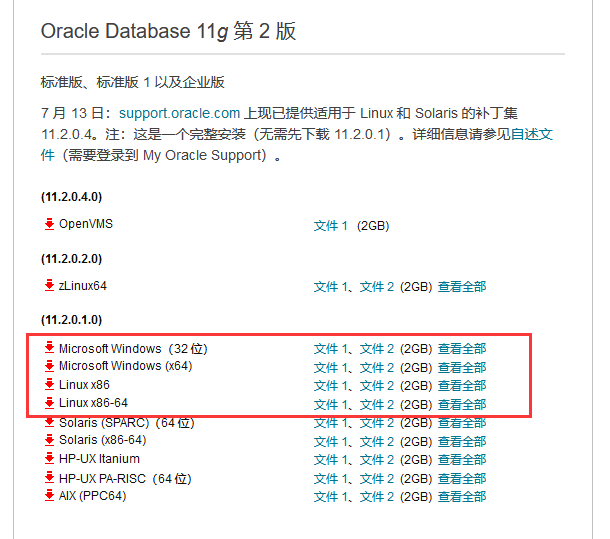
1、下载 Oracle 11g
官方地址:https://www.oracle.com/technetwork/cn/database/enterprise-edition/downloads/index.html

根据系统平台架构选择下载不同的版本,此处以 Linux x86-64 为例:

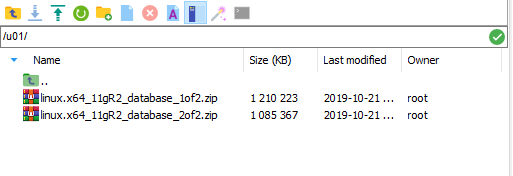
2、上传安装包到 u01/ 目录

[root@oracle11g ~]# cd /u01/
[root@oracle11g u01]# ls
linux.x64_11gR2_database_1of2.zip  linux.x64_11gR2_database_2of2.zip
3、解压文件到当前目录:
[root@oracle11g u01]# unzip linux.x64_11gR2_database_1of2.zip
[root@oracle11g u01]# unzip linux.x64_11gR2_database_2of2.zip
如果unzip命令不能使用,依次执行如下命令:
[root@oracle11g u01]# yum list | grep zip/unzip
[root@oracle11g u01]# yum install -y zip
[root@oracle11g u01]# yum install -y unzip
到此,Oracle 11g 安装的基础环境和安装包已经准备好,在后面的两篇文章内,将分别讲述如何进行
静默安装和图形化界面安装!
参考资料:
https://www.cnblogs.com/mmzs/p/9033112.html#_label0_6
https://blog.csdn.net/qq_28643817/article/details/85295831
最后编辑:Jeebiz 更新时间:2025-11-03 22:29
