Apereo CAS :自定义登录成功后的返回信息
Apereo CAS 与第三方单点认证成功后,默认返回的信息比较少或者可用的信息不多,使得第三方在编写接入的逻辑代码时,会比较不便。因此,我们需要改造 Apereo CAS 登录方法,追加 扩展信息
- 1、修改 Apereo CAS 的登录方法,追加 扩展信息
- 2、修改 Apereo CAS 的验票方法
/p3/validate,实时获取Redis缓存中的动态信息
修改 Apereo CAS 的 票据校验方法
1、引入 Maven 依赖
Apereo CAS 当前主要是采用 Overlay 的方式进行扩展。要想找到验证相关的对象,需要将相关的依赖项添加到项目的 Maven pom.xml 文件中:
<dependency>
    <groupId>org.apereo.cas</groupId>
    <artifactId>cas-server-support-validation</artifactId>
    <version>${cas.version}</version>
</dependency>
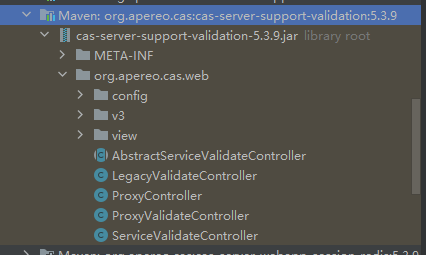
然后找到 cas-server-support-validation,展开包结构,我们可以看到如下图所示效果:

2、分析源码
首先找到 CAS Client 的单点对接,进行登录验证的 API 入口:
| URI | 描述 |
|---|---|
| /validate | service ticket validation [CAS 1.0] |
| /serviceValidate | service ticket validation [CAS 2.0] |
| /proxyValidate | service/proxy ticket validation [CAS 2.0] |
| /proxy | proxy ticket service [CAS 2.0] |
| /p3/serviceValidate | service ticket validation [CAS 3.0] |
| /p3/proxyValidate | service/proxy ticket validation [CAS 3.0] |
- /p3/proxyValidate :
V3ProxyValidateController中的handle方法@GetMapping(path = CasProtocolConstants.ENDPOINT_PROXY_VALIDATE_V3) @Override protected ModelAndView handle(final HttpServletRequest request, final HttpServletResponse response) throws Exception { return super.handleRequestInternal(request, response); } - /p3/serviceValidate :
V3ServiceValidateController中的handle方法@GetMapping(path = CasProtocolConstants.ENDPOINT_SERVICE_VALIDATE_V3) protected ModelAndView handle(final HttpServletRequest request, final HttpServletResponse response) throws Exception { return super.handleRequestInternal(request, response); }
从两个方法的代码可见,除暴露的地址不同,代码逻辑都是一样的,最终都会进入父类 AbstractServiceValidateController 的 handleRequestInternal 方法;
该方法执行逻辑如下:
- 从请求中提取参数
- 检查参数,缺少参数时会跳到失败页面
- 准备票据验证的空方法,可用于扩展自定义前置逻辑
- 处理票据验证
@Override
public ModelAndView handleRequestInternal(final HttpServletRequest request, final HttpServletResponse response) throws Exception {
    // 提取请求参数
    final WebApplicationService service = this.argumentExtractor.extractService(request);
    final String serviceTicketId = service != null ? service.getArtifactId() : null;
    // 参数检查,缺少参数时会跳到失败页面
    if (service == null || !StringUtils.hasText(serviceTicketId)) {
        LOGGER.debug("Could not identify service and/or service ticket for service: [{}]", service);
        return generateErrorView(CasProtocolConstants.ERROR_CODE_INVALID_REQUEST, null, request, service);
    }
    try {
        // 准备票据验证的空方法,可用于扩展自定义前置逻辑
        prepareForTicketValidation(request, service, serviceTicketId);
        // 处理票据验证
        return handleTicketValidation(request, service, serviceTicketId);
    } catch (final AbstractTicketValidationException e) {
        final String code = e.getCode();
        return generateErrorView(code, new Object[]{serviceTicketId, e.getService().getId(), service.getId()}, request, service);
    } catch (final AbstractTicketException e) {
        return generateErrorView(e.getCode(), new Object[]{serviceTicketId}, request, service);
    } catch (final UnauthorizedProxyingException e) {
        return generateErrorView(CasProtocolConstants.ERROR_CODE_UNAUTHORIZED_SERVICE_PROXY, new Object[]{service.getId()}, request, service);
    } catch (final UnauthorizedServiceException | PrincipalException e) {
        return generateErrorView(CasProtocolConstants.ERROR_CODE_UNAUTHORIZED_SERVICE, null, request, service);
    }
}
继续跟踪上面的方法中有返回结果的 generateErrorView 和 handleTicketValidation 方法,查看具体逻辑
generateErrorView 方法:
private ModelAndView generateErrorView(final String code, final Object[] args, final HttpServletRequest request, final WebApplicationService service) {
    // 根据获取 ModelAndView 对象
    final ModelAndView modelAndView = getModelAndView(request, false, service);
    // 填充返回的内容属性
    final String convertedDescription = this.applicationContext.getMessage(code, args, code, request.getLocale());
    modelAndView.addObject(CasViewConstants.MODEL_ATTRIBUTE_NAME_ERROR_CODE, StringEscapeUtils.escapeHtml4(code));
    modelAndView.addObject(CasViewConstants.MODEL_ATTRIBUTE_NAME_ERROR_DESCRIPTION, StringEscapeUtils.escapeHtml4(convertedDescription));
    return modelAndView;
}
handleTicketValidation 方法:
protected ModelAndView handleTicketValidation(final HttpServletRequest request, final WebApplicationService service, final String serviceTicketId) {
    TicketGrantingTicket proxyGrantingTicketId = null;
    // 从请求中获取服务凭据
    final Credential serviceCredential = getServiceCredentialsFromRequest(service, request);
    if (serviceCredential != null) {
        try {
            // 处理代理 GT 传递
            proxyGrantingTicketId = handleProxyGrantingTicketDelivery(serviceTicketId, serviceCredential);
        } catch (final AuthenticationException e) {
            LOGGER.warn("Failed to authenticate service credential [{}]", serviceCredential);
            // 遇到异常,返回错误视图
            return generateErrorView(CasProtocolConstants.ERROR_CODE_INVALID_PROXY_CALLBACK, new Object[]{serviceCredential.getId()}, request, service);
        } catch (final InvalidTicketException e) {
            LOGGER.error("Failed to create proxy granting ticket due to an invalid ticket for [{}]", serviceCredential, e);
            // 遇到异常,返回错误视图
            return generateErrorView(e.getCode(), new Object[]{serviceTicketId}, request, service);
        } catch (final AbstractTicketException e) {
            LOGGER.error("Failed to create proxy granting ticket for [{}]", serviceCredential, e);
            // 遇到异常,返回错误视图
            return generateErrorView(e.getCode(), new Object[]{serviceCredential.getId()}, request, service);
        }
    }
    // 验证服务凭据,并返回 Assertion 对象
    final Assertion assertion = validateServiceTicket(service, serviceTicketId);
    // 验证服务票据 Assertion 信息
    if (!validateAssertion(request, serviceTicketId, assertion, service)) {
        // 验证不通过,返回错误视图
        return generateErrorView(CasProtocolConstants.ERROR_CODE_INVALID_TICKET, new Object[]{serviceTicketId}, request, service);
    }
    // 验证认证上下文
    final Pair<Boolean, Optional<MultifactorAuthenticationProvider>> ctxResult = validateAuthenticationContext(assertion, request);
    if (!ctxResult.getKey()) {
        // 验证不通过,返回错误视图
        throw new UnsatisfiedAuthenticationContextTicketValidationException(assertion.getService());
    }
    String proxyIou = null;
    if (serviceCredential != null && this.proxyHandler != null && this.proxyHandler.canHandle(serviceCredential)) {
        // 获取 proxyIou
        proxyIou = handleProxyIouDelivery(serviceCredential, proxyGrantingTicketId);
        if (StringUtils.isEmpty(proxyIou)) {
            // 未获取到,返回错误视图
            return generateErrorView(CasProtocolConstants.ERROR_CODE_INVALID_PROXY_CALLBACK, new Object[]{serviceCredential.getId()}, request, service);
        }
    } else {
        LOGGER.debug("No service credentials specified, and/or the proxy handler [{}] cannot handle credentials", this.proxyHandler);
    }
    // 触发验证成功的事件
    onSuccessfulValidation(serviceTicketId, assertion);
    LOGGER.debug("Successfully validated service ticket [{}] for service [{}]", serviceTicketId, service.getId());
    // 返回成功视图
    return generateSuccessView(assertion, proxyIou, service, request, ctxResult.getValue(), proxyGrantingTicketId);
}
在 handleTicketValidation 方法中分别调用了以下方法:
| 方法 | 描述 |
|---|---|
| getServiceCredentialsFromRequest | 用于确定要使用哪些凭据来授予给 PGT(proxy granting ticket) 。默认情况是使用pgtUrl |
| handleProxyGrantingTicketDelivery | 处理代理授权票证传递 |
| validateServiceTicket | 验证服务票据 Assertion 信息 |
| validateAuthenticationContext | 验证认证上下文 |
| handleProxyIouDelivery | 获取 proxyIou |
| generateErrorView | 生成错误视图 |
| onSuccessfulValidation | 成功验证时触发事件。扩展此方法可作为钩子插入扩展行为。 |
| generateSuccessView | 生成成功视图 |
首先,我们看看,成功的时候,返回了什么?
private ModelAndView generateSuccessView(final Assertion assertion, final String proxyIou,
                                         final WebApplicationService service, final HttpServletRequest request,
                                         final Optional<MultifactorAuthenticationProvider> contextProvider,
                                         final TicketGrantingTicket proxyGrantingTicket) {
    // 根据获取 ModelAndView 对象
    final ModelAndView modelAndView = getModelAndView(request, true, service);
    // 填充返回的内容
    modelAndView.addObject(CasViewConstants.MODEL_ATTRIBUTE_NAME_ASSERTION, assertion);
    modelAndView.addObject(CasViewConstants.MODEL_ATTRIBUTE_NAME_SERVICE, service);
    if (StringUtils.hasText(proxyIou)) {
        modelAndView.addObject(CasViewConstants.MODEL_ATTRIBUTE_NAME_PROXY_GRANTING_TICKET_IOU, proxyIou);
    }
    if (proxyGrantingTicket != null) {
        modelAndView.addObject(CasViewConstants.MODEL_ATTRIBUTE_NAME_PROXY_GRANTING_TICKET, proxyGrantingTicket.getId());
    }
    contextProvider.ifPresent(provider -> modelAndView.addObject(this.authnContextAttribute, provider.getId()));
    final Map<String, ?> augmentedModelObjects = augmentSuccessViewModelObjects(assertion);
    if (augmentedModelObjects != null) {
        modelAndView.addAllObjects(augmentedModelObjects);
    }
    return modelAndView;
}
到这里,我们再次看到了 getModelAndView 方法,说明此方法是一个通用的方法。我们就去看看 getModelAndView 方法的具体逻辑是什么样的?
private ModelAndView getModelAndView(final HttpServletRequest request, final boolean isSuccess, final WebApplicationService service) {
    // 根据 service 对象参数判断响应的数据格式,默认 XML 格式
    ValidationResponseType type = service != null ? service.getFormat() : ValidationResponseType.XML;
    // 从请求中获取 format 参数,如果有指定该参数,则返回参数指定的数据格式
    final String format = request.getParameter(CasProtocolConstants.PARAMETER_FORMAT);
    if (!StringUtils.isEmpty(format)) {
        try {
            type = ValidationResponseType.valueOf(format.toUpperCase());
        } catch (final Exception e) {
            LOGGER.warn(e.getMessage(), e);
        }
    }
    // 如果响应的数据格式是JSON类型,则返回 jsonView 视图
    if (type == ValidationResponseType.JSON) {
        return new ModelAndView(this.jsonView);
    }
    // 否则返回,successView 或 failureView 视图
    return new ModelAndView(isSuccess ? this.successView : this.failureView);
}
从上面的逻辑可看出,最终返回的内容是什么样的与 jsonView、successView、failureView 这三个视图对象有很大的关系。那这几个参数又是从哪里来的呢?
全局搜索源码,可以搜索到这几个参数是通过 AbstractServiceValidateController 的构造器注入进来的,那就可以去看看AbstractServiceValidateController的子类都有谁?

这里可看到与 验证有关的5个Controller,
- LegacyValidateController
- ProxyValidateController
- ServiceValidateController
- V3ProxyValidateController
- V3ServiceValidateController
继续全局搜索源码,可发现,上面的几个控制器都是在配置类 CasValidationConfiguration 中初始化出来的
V3ServiceValidateController
@Bean
@ConditionalOnMissingBean(name = "v3ServiceValidateController")
public V3ServiceValidateController v3ServiceValidateController() {
    return new V3ServiceValidateController(
        cas20WithoutProxyProtocolValidationSpecification,
        authenticationSystemSupport.getIfAvailable(),
        servicesManager,
        centralAuthenticationService,
        proxy20Handler.getIfAvailable(),
        argumentExtractor.getIfAvailable(),
        multifactorTriggerSelectionStrategy,
        authenticationContextValidator,
        cas3ServiceJsonView(),
        cas3ServiceSuccessView(),
        cas3ServiceFailureView,
        casProperties.getAuthn().getMfa().getAuthenticationContextAttribute(),
        serviceValidationAuthorizers,
        casProperties.getSso().isRenewAuthnEnabled()
    );
}
V3ProxyValidateController
@Bean
@ConditionalOnMissingBean(name = "v3ProxyValidateController")
@ConditionalOnProperty(prefix = "cas.sso", name = "proxyAuthnEnabled", havingValue = "true", matchIfMissing = true)
public V3ProxyValidateController v3ProxyValidateController() {
    return new V3ProxyValidateController(
        cas20ProtocolValidationSpecification,
        authenticationSystemSupport.getIfAvailable(),
        servicesManager,
        centralAuthenticationService,
        proxy20Handler.getIfAvailable(),
        argumentExtractor.getIfAvailable(),
        multifactorTriggerSelectionStrategy,
        authenticationContextValidator,
        cas3ServiceJsonView(),
        cas3ServiceSuccessView(),
        cas3ServiceFailureView,
        casProperties.getAuthn().getMfa().getAuthenticationContextAttribute(),
        serviceValidationAuthorizers,
        casProperties.getSso().isRenewAuthnEnabled()
    );
}
通过源码,我们看到,这里有 cas3ServiceJsonView() 和 cas3ServiceSuccessView() 两个方法,cas3ServiceFailureView 全局对象。
我们进一步查看cas3ServiceSuccessView()这个方法,发现其是Cas30ResponseView 的实例化方法,这里我们需要关注 cas3SuccessView 参数
@Bean
@ConditionalOnMissingBean(name = "cas3ServiceSuccessView")
public View cas3ServiceSuccessView() {
    final String authenticationContextAttribute = casProperties.getAuthn().getMfa().getAuthenticationContextAttribute();
    final boolean isReleaseProtocolAttributes = casProperties.getAuthn().isReleaseProtocolAttributes();
    return new Cas30ResponseView(true,
        protocolAttributeEncoder,
        servicesManager,
        authenticationContextAttribute,
        cas3SuccessView,
        isReleaseProtocolAttributes,
        authenticationAttributeReleasePolicy,
        authenticationServiceSelectionPlan.getIfAvailable(),
        cas3ProtocolAttributesRenderer());
}
继续搜索源码,我们在 CasProtocolViewsConfiguration 对象代码中找到了 cas3SuccessView 这个方法
@Bean
@Scope(value = ConfigurableBeanFactory.SCOPE_PROTOTYPE)
public CasProtocolView cas3SuccessView() {
    return new CasProtocolView(casProperties.getView().getCas3().getSuccess(),
        applicationContext, springTemplateEngine, thymeleafProperties);
}
casProperties.getView().getCas3() 这段代码,可以找到配置对象 Cas30ViewProperties,通过查看这个配置对象,我们可以发现 CAS3 验证成功后的相对地址 protocol/3.0/casServiceValidationSuccess
public class Cas30ViewProperties implements Serializable {
    private static final long serialVersionUID = 2345062034300650858L;
 /**
     * The relative location of the CAS3 success validation bean.
     */
    private String success = "protocol/3.0/casServiceValidationSuccess";

    /**
     * The relative location of the CAS3 success validation bean.
     */
    private String failure = "protocol/3.0/casServiceValidationFailure";
    ...
}
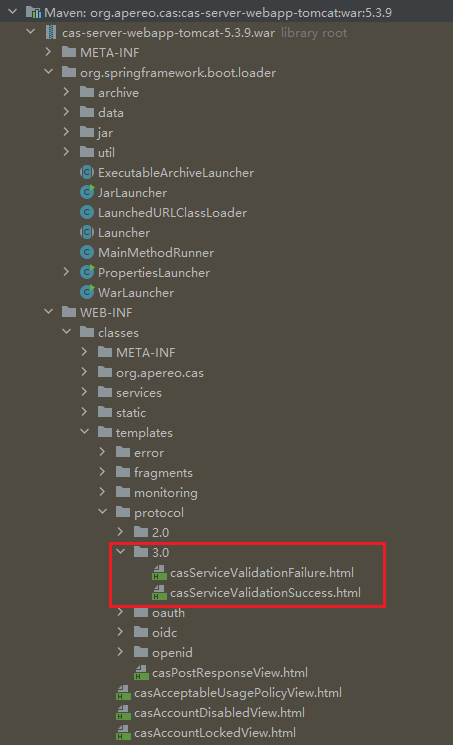
那如何找到这个 protocol/3.0/casServiceValidationSuccess 呢?前面讲到 Apereo CAS 当前主要是采用 Overlay 的方式进行扩展,那么我们一定会引入 War 包,比如我这里引入的是 Tomcat
<dependency>
    <groupId>org.apereo.cas</groupId>
    <artifactId>cas-server-webapp${app.server}</artifactId>
    <version>${cas.version}</version>
    <type>war</type>
    <scope>runtime</scope>
</dependency>
进入源码目录下找到此目录下的文件,我们可以看到 Cas 是使用 Thymeleaf 将 XML 渲染出来

原始 casServiceValidationSuccess.html 文件
<cas:serviceResponse xmlns:cas='http://www.yale.edu/tp/cas'>
    <cas:authenticationSuccess>
        <cas:user th:text="${principal.id}"/>
        <cas:proxyGrantingTicket th:if="${pgtIou}" th:text="${pgtIou}"/>
        <cas:proxies th:if="${not #lists.isEmpty(chainedAuthentications)}">
            <cas:proxy th:each="proxy : ${chainedAuthentications}" th:text="${proxy.principal.id}"/>
        </cas:proxies>
        <cas:attributes th:if="${not #lists.isEmpty(formattedAttributes)}">
            <div th:each="attr : ${formattedAttributes}" th:remove="tag">
                <div th:utext="${attr}" th:remove="tag"/>
            </div>
        </cas:attributes>
    </cas:authenticationSuccess>
</cas:serviceResponse>
这里可以看到 formattedAttributes 这个变量至关重要,它决定了返回的内容,搜索源码,找到了 CasProtocolConstants.VALIDATION_CAS_MODEL_ATTRIBUTE_NAME_FORMATTED_ATTRIBUTES 属性,通过这属性 我们又跟踪到了 Cas30ResponseView 对象的 putCasResponseAttributesIntoModel 方法:
protected void putCasResponseAttributesIntoModel(final Map<String, Object> model,
                                                 final Map<String, Object> attributes,
                                                 final RegisteredService registeredService) {

    LOGGER.debug("Beginning to encode attributes for the response");
    final Map<String, Object> encodedAttributes = this.protocolAttributeEncoder.encodeAttributes(attributes, registeredService);

    LOGGER.debug("Encoded attributes for the response are [{}]", encodedAttributes);
    super.putIntoModel(model, CasProtocolConstants.VALIDATION_CAS_MODEL_ATTRIBUTE_NAME_ATTRIBUTES, encodedAttributes);

    final Collection<String> formattedAttributes = this.attributesRenderer.render(encodedAttributes);
    super.putIntoModel(model, CasProtocolConstants.VALIDATION_CAS_MODEL_ATTRIBUTE_NAME_FORMATTED_ATTRIBUTES, formattedAttributes);
}可以看到,formattedAttributes 的源头是方法的 attributes 参数,顺着putCasResponseAttributesIntoModel 方法继续找,prepareMergedOutputModel,可以确定,最初源头是generateSuccessView 的 参数。
generateSuccessView(assertion, proxyIou, service, request, ctxResult.getValue(), proxyGrantingTicketId);回到 AbstractServiceValidateController 的 handleTicketValidation方法,可看到 Assertion 由 validateServiceTicket 方法产生;
final Assertion assertion = validateServiceTicket(service, serviceTicketId);进一步跟踪 validateServiceTicket 方法,可看到,此方法比较简单,主要是调用 CentralAuthenticationService 接口的 validateServiceTicket 方法
protected Assertion validateServiceTicket(final WebApplicationService service, final String serviceTicketId) {
    return this.centralAuthenticationService.validateServiceTicket(serviceTicketId, service);
}
根据查找 CentralAuthenticationService 接口的实现类,我们可以找到 DefaultCentralAuthenticationService 实现类
public Assertion validateServiceTicket(final String serviceTicketId, final Service service) throws AbstractTicketException {
    // 验证票据的真实性
    if (!isTicketAuthenticityVerified(serviceTicketId)) {
        LOGGER.info("Service ticket [{}] is not a valid ticket issued by CAS.", serviceTicketId);
        throw new InvalidTicketException(serviceTicketId);
    }
    // 根据 serviceTicketId 获取 Service ticket
    final ServiceTicket serviceTicket = this.ticketRegistry.getTicket(serviceTicketId, ServiceTicket.class);
    // 如果无法获取,则说明是无效的 Ticket
    if (serviceTicket == null) {
        LOGGER.warn("Service ticket [{}] does not exist.", serviceTicketId);
        throw new InvalidTicketException(serviceTicketId);
    }

    try {
        /*
         * Synchronization on ticket object in case of cache based registry doesn't serialize
         * access to critical section. The reason is that cache pulls serialized data and
         * builds new object, most likely for each pull. Is this synchronization needed here?
         */
        synchronized (serviceTicket) {
            // 检查 Service ticket 是否过期
            if (serviceTicket.isExpired()) {
                LOGGER.info("ServiceTicket [{}] has expired.", serviceTicketId);
                throw new InvalidTicketException(serviceTicketId);
            }
            // 检查 Service ticket 是否
            if (!serviceTicket.isValidFor(service)) {
                LOGGER.error("Service ticket [{}] with service [{}] does not match supplied service [{}]",
                    serviceTicketId, serviceTicket.getService().getId(), service);
                throw new UnrecognizableServiceForServiceTicketValidationException(serviceTicket.getService());
            }
        }
        // 从认证请求中解析 Service
        final Service selectedService = resolveServiceFromAuthenticationRequest(serviceTicket.getService());
        LOGGER.debug("Resolved service [{}] from the authentication request", selectedService);
        // 检查服务是否可以访问
        final RegisteredService registeredService = this.servicesManager.findServiceBy(selectedService);
        LOGGER.debug("Located registered service definition [{}] from [{}] to handle validation request", registeredService, selectedService);
        RegisteredServiceAccessStrategyUtils.ensureServiceAccessIsAllowed(selectedService, registeredService);
        // 从 Service ticket  获取 TGT
        final TicketGrantingTicket root = serviceTicket.getTicketGrantingTicket().getRoot();
        // 从TGT授权信息获取 Authentication 对象
        final Authentication authentication = getAuthenticationSatisfiedByPolicy(root.getAuthentication(),
            new ServiceContext(selectedService, registeredService));
        // 从 Authentication 获取旧的 Principal 对象
        final Principal principal = authentication.getPrincipal();
        // 从服务配置中获取最终返回的属性保留策略,如果这个对象不为空则决定了下面最终返回的属性
        final RegisteredServiceAttributeReleasePolicy attributePolicy = registeredService.getAttributeReleasePolicy();
        LOGGER.debug("Attribute policy [{}] is associated with service [{}]", attributePolicy, registeredService);
        // 创建新的 attributesToRelease
        final Map<String, Object> attributesToRelease = attributePolicy != null
            ? attributePolicy.getAttributes(principal, selectedService, registeredService) : new HashMap<>();

        LOGGER.debug("Calculated attributes for release per the release policy are [{}]", attributesToRelease.keySet());
        // 获取 principalId
        final String principalId = registeredService.getUsernameAttributeProvider().resolveUsername(principal, selectedService, registeredService);
        // 使用 PrincipalFactory 创建新的 Principal。这个地方很重要,是扩展的核心
        final Principal modifiedPrincipal = this.principalFactory.createPrincipal(principalId, attributesToRelease);
        final AuthenticationBuilder builder = DefaultAuthenticationBuilder.newInstance(authentication);
        builder.setPrincipal(modifiedPrincipal);
        LOGGER.debug("Principal determined for release to [{}] is [{}]", registeredService.getServiceId(), principalId);
        // 构建最终的认证信息
        final Authentication finalAuthentication = builder.build();
        // 创建审计上下文
        final AuditableContext audit = AuditableContext.builder().service(selectedService)
            .authentication(finalAuthentication)
            .registeredService(registeredService)
            .retrievePrincipalAttributesFromReleasePolicy(Boolean.FALSE)
            .build();
        // 执行审计逻辑
        final AuditableExecutionResult accessResult = this.registeredServiceAccessStrategyEnforcer.execute(audit);
        accessResult.throwExceptionIfNeeded();
        // ThreadLocal 绑定最终的认证信息
        AuthenticationCredentialsThreadLocalBinder.bindCurrent(finalAuthentication);
        // 创建 Assertion 对象
        final Assertion assertion = new DefaultAssertionBuilder(finalAuthentication)
            .with(selectedService)
            .with(serviceTicket.getTicketGrantingTicket().getChainedAuthentications())
            .with(serviceTicket.isFromNewLogin())
            .build();
        // 推送 CasServiceTicketValidatedEvent 事件
        doPublishEvent(new CasServiceTicketValidatedEvent(this, serviceTicket, assertion));

        return assertion;
    } finally {
        if (serviceTicket.isExpired()) {
            deleteTicket(serviceTicketId);
        } else {
            this.ticketRegistry.updateTicket(serviceTicket);
        }
    }
}
从上面的代码逻辑分析可得出结论,影响最终输出的认证结果信息的有2个逻辑:
第一段:原始数据的处理,这段逻辑过程为:查询票据 -> 从票据获取认证信息 -> 从认证信息获取 Principal -> 根据服务的属性保留策略,返回最后的属性
// 从 Service ticket  获取 TGT
        final TicketGrantingTicket root = serviceTicket.getTicketGrantingTicket().getRoot();
        // 从TGT授权信息获取 Authentication 对象
        final Authentication authentication = getAuthenticationSatisfiedByPolicy(root.getAuthentication(),
            new ServiceContext(selectedService, registeredService));
        // 从 Authentication 获取旧的 Principal 对象
        final Principal principal = authentication.getPrincipal();
        // 从服务配置中获取最终返回的属性保留策略,如果这个对象不为空则决定了下面最终返回的属性
        final RegisteredServiceAttributeReleasePolicy attributePolicy = registeredService.getAttributeReleasePolicy();
        LOGGER.debug("Attribute policy [{}] is associated with service [{}]", attributePolicy, registeredService);
        // 创建新的 attributesToRelease
        final Map<String, Object> attributesToRelease = attributePolicy != null
            ? attributePolicy.getAttributes(principal, selectedService, registeredService) : new HashMap<>();
        LOGGER.debug("Calculated attributes for release per the release policy are [{}]", attributesToRelease.keySet());
第二段:认证授权信息的二次处理,这段逻辑过程为:从旧的Principal获取 principalId -> 基于旧的 Principal 创建一个新的Principal -> 构建认证结果对象
final String principalId = registeredService.getUsernameAttributeProvider().resolveUsername(principal, selectedService, registeredService);
            final Principal modifiedPrincipal = this.principalFactory.createPrincipal(principalId, attributesToRelease);
            final AuthenticationBuilder builder = DefaultAuthenticationBuilder.newInstance(authentication);
            builder.setPrincipal(modifiedPrincipal);
            LOGGER.debug("Principal determined for release to [{}] is [{}]", registeredService.getServiceId(), principalId);

            final Authentication finalAuthentication = builder.build();
两端代码,给了我们两种不一样的改造思路:
改造方案1
- 修改
DefaultCentralAuthenticationService的validateServiceTicket方法中的Map<String, Object> attributesToRelease处代码,新增扩展的属性 - 修改
casServiceValidationSuccess.html文件,新增新的返回属性
改造方案2
- 自定义新的
CentralAuthenticationService实现类,注入Spring取代默认的DefaultCentralAuthenticationService - 自定义新的
PrincipalFactory实现类,注入Spring取代默认的DefaultPrincipalFactory
综合会考虑我认为,方案一,改造简单,但是对代码逻辑污染较重,且会照成返回内容不标准,三方对接时,注意事项较多。方案二改造需要覆盖对象多,但是代码解耦,继续采用原有的数据结构,对接是影响较小。
4、实施改造方案2【推荐】
自定义 PrincipalFactory 实现类,实现从Redis缓存中获取自定义属性
import lombok.EqualsAndHashCode;
import lombok.extern.slf4j.Slf4j;
import org.springframework.data.redis.core.RedisTemplate;

import java.util.Map;

@Slf4j
@EqualsAndHashCode
public class MyPrincipalFactory implements PrincipalFactory {
    private static final long serialVersionUID = -3999695695604948495L;
    private RedisTemplate userRedisTemplate;

    public MyPrincipalFactory(final RedisTemplate userRedisTemplate) {
        this.userRedisTemplate = userRedisTemplate;
    }

    @Override
    public Principal createPrincipal(final String id, final Map<String, Object> attributes) {
        // 1、门户登录成功后,会记录登录信息到缓存中(此处代码很重要,是实现全局统一认证信息的一部分)
        String rdsKey = BizRedisKey.USER_LOGIN_INFO.getKey(id);
        // 1.1、从缓存获取登录信息
        Map<String, Object> loginInfoMap = userRedisTemplate.opsForHash().entries(rdsKey);
        // 1.2、设置缓存中登录信息到 Principal
        attributes.put("loginInfo", loginInfoMap);
        return new SimplePrincipal(id, attributes);
    }
}
注入自定义 PrincipalFactory 到 Spring 上下文,覆盖默认实现:
import lombok.extern.slf4j.Slf4j;
import org.apereo.cas.authentication.principal.MyPrincipalFactory;
import org.apereo.cas.authentication.principal.PrincipalFactory;
import org.apereo.cas.configuration.CasConfigurationProperties;
import org.springframework.beans.factory.ObjectProvider;
import org.springframework.boot.context.properties.EnableConfigurationProperties;
import org.springframework.context.annotation.Bean;
import org.springframework.context.annotation.Configuration;
import org.springframework.data.redis.core.RedisTemplate;
import org.springframework.transaction.annotation.EnableTransactionManagement;

@Configuration("casCoreExtConfiguration")
@EnableConfigurationProperties(CasConfigurationProperties.class)
@EnableTransactionManagement(proxyTargetClass = true)
@Slf4j
public class CasCoreExtConfiguration {

    @Bean(name = "principalFactory")
    public PrincipalFactory principalFactory(ObjectProvider<RedisTemplate> userRedisTemplate){
        return new MyPrincipalFactory(userRedisTemplate.getIfAvailable());
    }

}
参考资料:
最后编辑:Jeebiz 更新时间:2024-05-06 16:13
