一、安装准备
1、系统要求
| 最低要求 | |
|---|---|
| CPU | 支持 64 位的 Intel® 或 AMD 处理器*;2 GHz 或速度更快的处理器 |
| 内存 | 8 GB 或更大 RAM(推荐使用 16 GB) |
| 硬盘 | 需要 20GB 以上的可用磁盘空间 |
| 操作系统 | CentOS 7 或更高版本 |
2、软件要求
- Redis 5.0 安装包
一、环境设置
1、设置镜像源
因为国外镜像网速较慢,推荐设置阿里云镜像源:https://opsx.alibaba.com/mirror
1.1、备份
[root@redis ~]# mv /etc/yum.repos.d/CentOS-Base.repo /etc/yum.repos.d/CentOS-Base.repo.backup1.2、下载新的CentOS-Base.repo 到/etc/yum.repos.d/
[root@redis ~]# wget -O /etc/yum.repos.d/CentOS-Base.repo http://mirrors.aliyun.com/repo/Centos-7.repo或者
[root@redis ~]# curl -o /etc/yum.repos.d/CentOS-Base.repo http://mirrors.aliyun.com/repo/Centos-7.repo1.3、之后运行yum makecache生成缓存
2、配置静态IP
通常在/etc/sysconfig/network-scripts目录下都会有 ifcfg-eth0 格式文件,修改该文件内容:
[root@redis ~]# vim /etc/sysconfig/network-scripts/ifcfg-eth0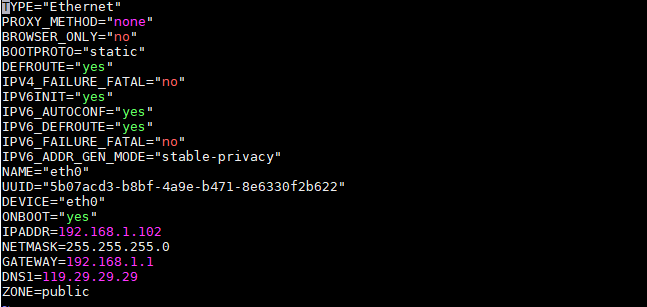
主要修改BOOTPROTO="static"、ONBOOT="yes",并增加 IPADDR、NETMASK、GATEWAY、DNS1。
TYPE="Ethernet"
PROXY_METHOD="none"
BROWSER_ONLY="no"
BOOTPROTO="static"
DEFROUTE="yes"
IPV4_FAILURE_FATAL="no"
IPV6INIT="yes"
IPV6_AUTOCONF="yes"
IPV6_DEFROUTE="yes"
IPV6_FAILURE_FATAL="no"
IPV6_ADDR_GEN_MODE="stable-privacy"
NAME="eth0"
UUID="5b07acd3-b8bf-4a9e-b471-8e6330f2b622"
DEVICE="eth0"
ONBOOT="yes"
IPADDR=192.168.1.102
NETMASK=255.255.255.0
GATEWAY=192.168.1.1
DNS1=119.29.29.29
ZONE=public
重启网卡
[root@redis ~]# service network restart3、关闭防火墙
常用命令
[root@redis]# systemctl start firewalld    启动
[root@redis]# systemctl stop firewalld    关闭
[root@redis]# systemctl status firewalld    查看状态
[root@redis]# systemctl disable firewalld    开机禁用
[root@redis]# systemctl enable firewalld    开机启用
https://redis.io/docs/latest/operate/oss_and_stack/install/install-stack/
三、服务安装
1、第三方工具安装 Redis(性能要求不高时推荐此方式)
可以借助 Linux 服务器运维面板 “宝塔面板”,轻松实现单机版Redis服务安装。
“宝塔面板” 官方地址:https://www.bt.cn/
1.1、执行命令安装 “宝塔面板”
安装说明详见:https://www.bt.cn/bbs/thread-19376-1-1.html
Centos安装命令:
[root@redis]# yum install -y wget && wget -O install.sh http://download.bt.cn/install/install_6.0.sh && sh install.shUbuntu/Deepin安装命令:
[root@redis]# wget -O install.sh http://download.bt.cn/install/install-ubuntu_6.0.sh && sudo bash install.shDebian安装命令:
[root@redis]# wget -O install.sh http://download.bt.cn/install/install-ubuntu_6.0.sh && bash install.shFedora安装命令:
[root@redis]# wget -O install.sh http://download.bt.cn/install/install_6.0.sh && bash install.shLinux面板6.9.7升级命令:
[root@redis]# curl http://download.bt.cn/install/update6.sh|bash当服务安装成功后,会出现下面的提示信息(务必备份访问地址及账号信息):
Starting Bt-Panel... Bt-Panel (pid 6835 6871) already running
Starting Bt-Tasks... Bt-Tasks (pid 6885) already running
==================================================================
Congratulations! Installed successfully!
==================================================================
Bt-Panel: http://192.168.1.119:8888/5bf8dc5b
username: kwldr4gs
password: b8f2b22c
Warning:
If you cannot access the panel,
release the following port (8888|888|80|443|20|21) in the security group
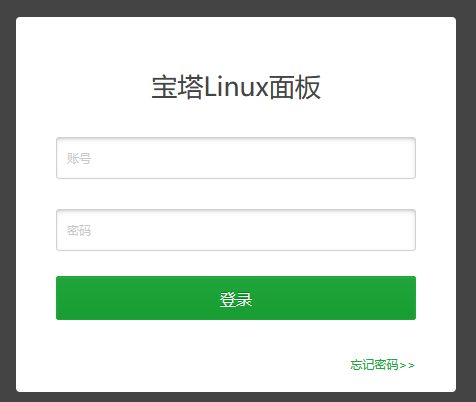
此处应该访问地址:http://主机IP:8888/5bf8dc5b ,如“http://192.168.1.119:8888/5bf8dc5b” ;看到如下界面说明安装完成!
1.2、通过管理面板安装 Redis
使用前面安装后告知的账号密码登录 “宝塔面板”,忽略默认的提示;
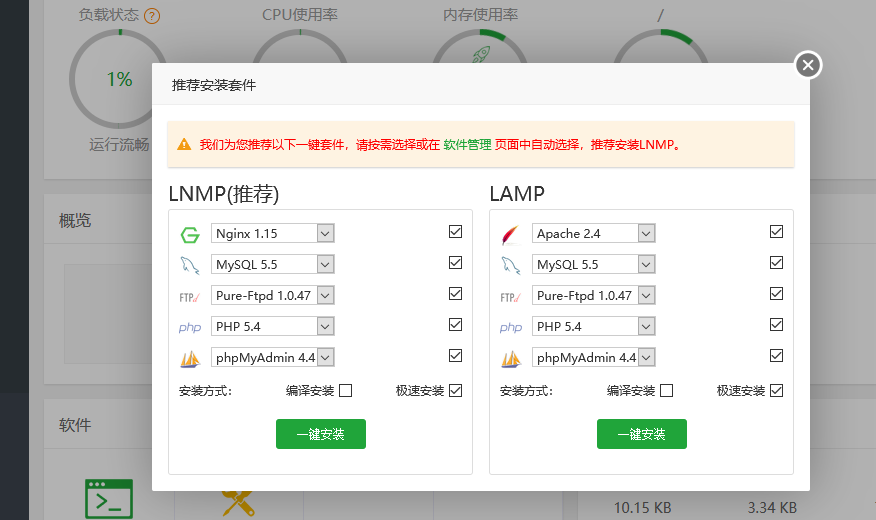
进入“软件商店”功能,在第三页找到Redis服务,点击安装,服务即自动完成安装!

服务安装完成后,可设置“首页显示”,点击“设置”可进行参数调整。

性能调整:服务默认已经做了部分参数优化,可根据服务器情况自行调整,这里主要调整绑定IP和访问密码
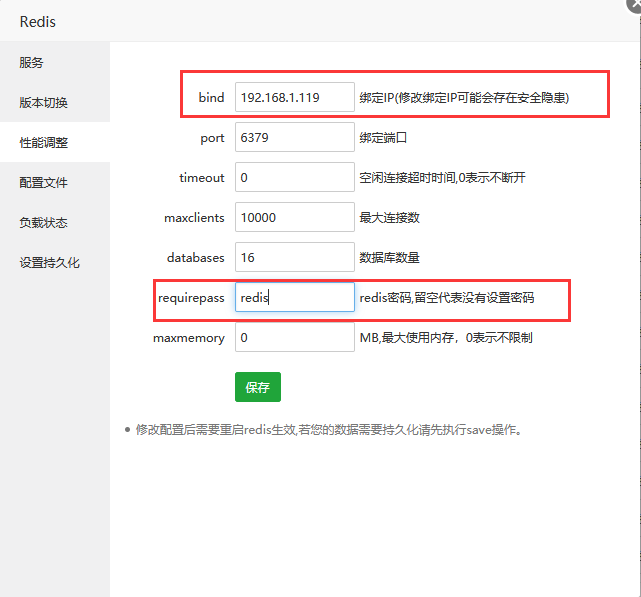
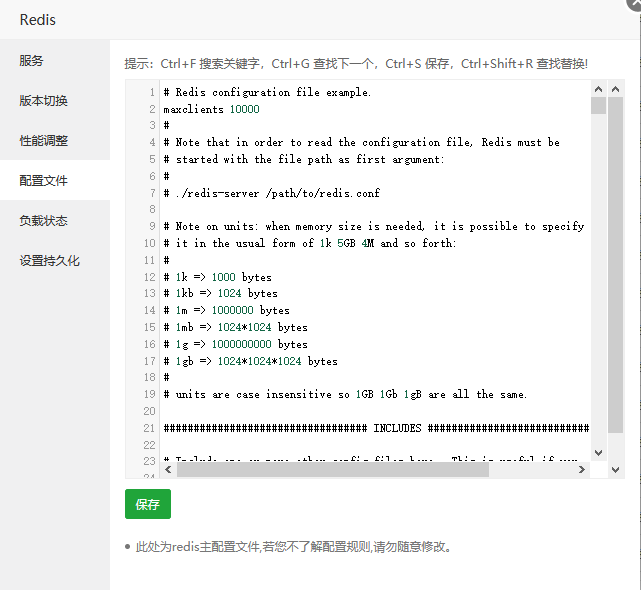
如果有更多的参数调整,可在“配置文件”选项进行调整
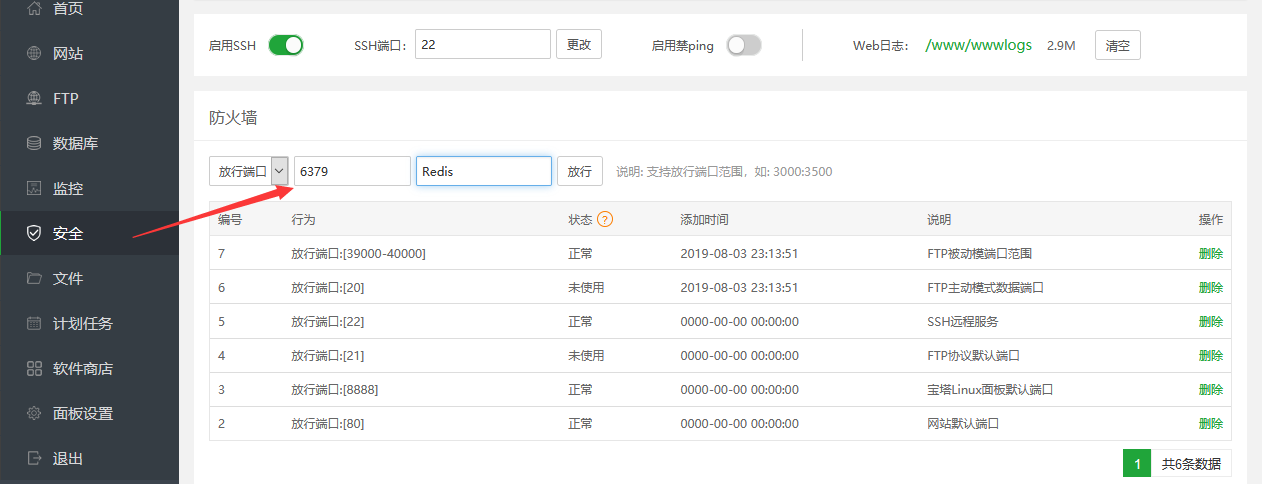
安装完成后,就是对外开放接口;通过“安全”功能,可进行开放端口的管理,这里开放6379端口,以便其他服务器可以访问。
到此,借助“宝塔面板”实现Redis安装和配置就完成了。
2、源码方式安装 Redis
官方指导说明:https://redis.io/download
特点
1、Redis支持数据的持久化,可以将内存中的数据保存在磁盘中,重启的时候可以再次加载进行使用。
2、Redis不仅仅支持简单的key - value类型的数据,同时还提供list、set、zset、hash等数据结构的存储。
3、Redis支持数据的备份,即master - slave模式的数据备份。
http://download.redis.io/releases/
2.1、下载安装包
下载最新安装包: https://redis.io/download
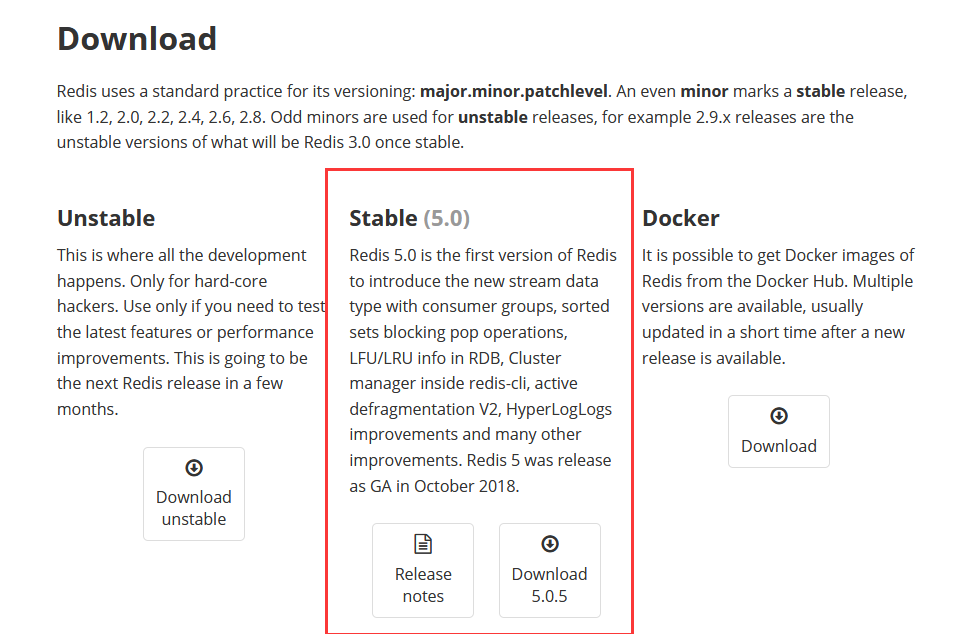
下载最新稳定版的Redis安装包.
[root@redis ~]# cd /usr/local
[root@redis local]# wget http://download.redis.io/releases/redis-5.0.5.tar.gz
2.2 安装依赖组件
Redis是C语言开发,安装Redis需要先将官网下载的源码进行编译;在没有gcc的环境需要先安装gcc
[root@fastdfs ~]# yum install -y gcc gcc-c++2.3 安装 Redis
[root@redis local]# tar -zxvf redis-5.0.5.tar.gz
[root@redis local]# ls
bin  etc  games  include  lib  lib64  libexec  redis-5.0.5  redis-5.0.5.tar.gz  sbin  share  src
[root@redis local]# cd redis-5.0.5/
[root@redis redis-5.0.5]# ls
00-RELEASENOTES  CONTRIBUTING  deps     Makefile   README.md   runtest          runtest-moduleapi  sentinel.conf  tests
BUGS             COPYING       INSTALL  MANIFESTO  redis.conf  runtest-cluster  runtest-sentinel   src            utils
[root@redis redis-5.0.5]# make
编译成功后会输出下面内容:
Hint: It’s a good idea to run ‘make test’ ;)
2.3.1 在Redis的构建中会遇到不少的报错,具体如下:
- zmalloc.h:50:31: 致命错误:jemalloc/jemalloc.h:没有那个文件或目录
解决方法如下:
[root@redis redis-5.0.5]# make MALLOC=libc2.3.2 编译完成后执行安装命令:
然后我们进行指定位置安装:(这里安装,我们指定的安装目录是:/usr/local/redis。会看到我们目录下会生成一个redis文件夹)
[root@redis redis-5.0.5]# make PREFIX=/usr/local/redis install2.3.3 进入到之前解压的文件夹里,找到redis.conf这个文件
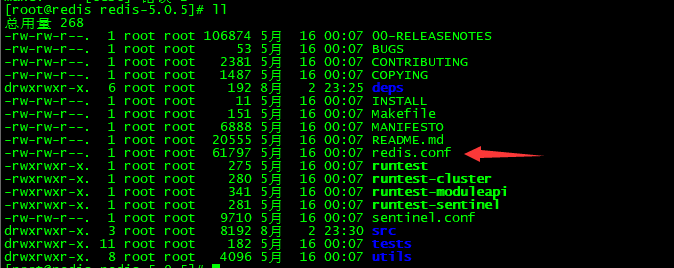
复制到安装的目录下:
[root@redis redis-5.0.5]# cp redis.conf /usr/local/redis2.3.4 启动 Redis
进入bin目录,启动Redis,看到如下图效果,表示安装成功!
[root@redis bin]# ./redis-server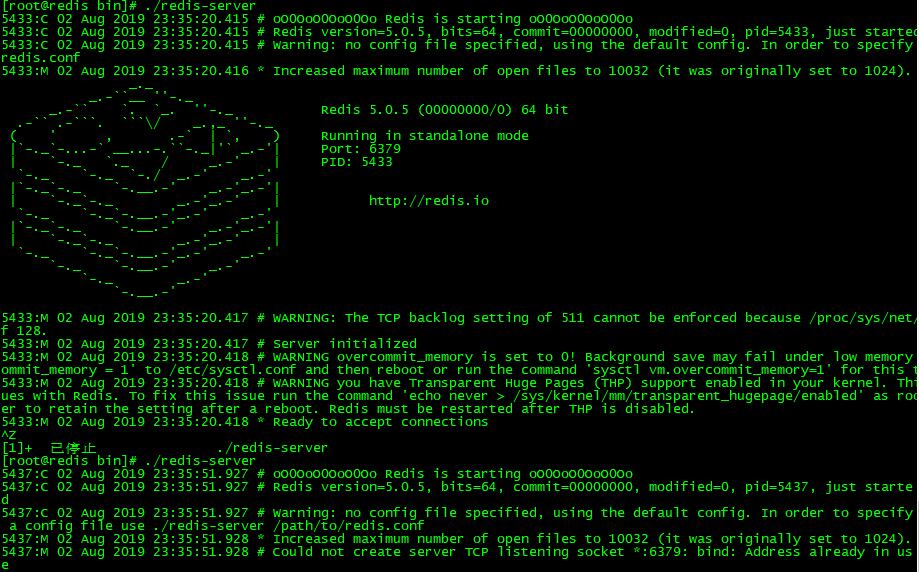
2.4 配置 Redis
修改配置文件:redis.conf
# By default Redis does not run as a daemon. Use 'yes' if you need it.
# Note that Redis will write a pid file in /var/run/redis.pid when daemonized.
daemonize yes
################################## NETWORK #####################################

# By default, if no "bind" configuration directive is specified, Redis listens
# for connections from all the network interfaces available on the server.
# It is possible to listen to just one or multiple selected interfaces using
# the "bind" configuration directive, followed by one or more IP addresses.
#
# Examples:
#
# bind 192.168.1.100 10.0.0.1
# bind 127.0.0.1 ::1
#
# ~~~ WARNING ~~~ If the computer running Redis is directly exposed to the
# internet, binding to all the interfaces is dangerous and will expose the
# instance to everybody on the internet. So by default we uncomment the
# following bind directive, that will force Redis to listen only into
# the IPv4 loopback interface address (this means Redis will be able to
# accept connections only from clients running into the same computer it
# is running).
#
# IF YOU ARE SURE YOU WANT YOUR INSTANCE TO LISTEN TO ALL THE INTERFACES
# JUST COMMENT THE FOLLOWING LINE.
# ~~~~~~~~~~~~~~~~~~~~~~~~~~~~~~~~~~~~~~~~~~~~~~~~~~~~~~~~~~~~~~~~~~~~~~~~
bind 192.168.2.119 #指定为主机IP
修改配置文件后,后端启动
[root@redis bin]# ./redis-server ../redis.conf
5472:C 02 Aug 2019 23:46:03.372 # oO0OoO0OoO0Oo Redis is starting oO0OoO0OoO0Oo
5472:C 02 Aug 2019 23:46:03.372 # Redis version=5.0.5, bits=64, commit=00000000, modified=0, pid=5472, just started
5472:C 02 Aug 2019 23:46:03.372 # Configuration loaded在线测试:http://try.redis.io/
使用文档:http://doc.redisfans.com/
3、Redis 随机启动:
进入Redis安装源码的utils目录,会看到一个安装脚本,执行该脚本,并根据提示输入正确的内容:
/usr/local/redis/redis.conf
/usr/local/redis/data/6379
/usr/local/redis/bin/redis-cli
[root@redis utils]# ./install_server.sh
Welcome to the redis service installer
This script will help you easily set up a running redis server

Please select the redis port for this instance: [6379]
Selecting default: 6379
Please select the redis config file name [/etc/redis/6379.conf] /usr/local/redis/redis.conf
Please select the redis log file name [/var/log/redis_6379.log]
Selected default - /var/log/redis_6379.log
Please select the data directory for this instance [/var/lib/redis/6379] /usr/local/redis/data/6379
Please select the redis executable path [] /usr/local/redis/bin/redis-cli
Selected config:
Port           : 6379
Config file    : /usr/local/redis/redis.conf
Log file       : /var/log/redis_6379.log
Data dir       : /usr/local/redis/data/6379
Executable     : /usr/local/redis/bin/redis-cli
Cli Executable : /usr/local/redis/bin/redis-cli
Is this ok? Then press ENTER to go on or Ctrl-C to abort.
Copied /tmp/6379.conf => /etc/init.d/redis_6379
Installing service...
Successfully added to chkconfig!
Successfully added to runlevels 345!
Starting Redis server...
Could not connect to Redis at 127.0.0.1:6379: Connection refused
ERROR: Failed starting service.... Aborting!
设置随机启动:
[root@nacos nacos]# systemctl daemon-reload
[root@nacos nacos]# systemctl enable redis.service
[root@nacos nacos]# systemctl start redis.service
[root@nacos nacos]# systemctl status redis.service最后编辑:Jeebiz 更新时间:2025-11-18 10:09
